Friday, December 17, 2010

Recycled Paper Ornaments

Mrs. Taylor over at School at St. George Place shared this awesome idea for ornaments made from recycled magazine pages!!! I decided to try it out with my 4th and 5th graders who were finished early with their painting unit, and oooohhh it turned out so great!!!


We used our massive collection of bottle caps to trace circles of various sizes and glued them together with glue sticks. A few students even glued them to large plastic lids to make them more sturdy! Also, some students glued them onto a square of colored paper instead of making an ornament - that looked great too! Check out the whole lesson plan on Mrs. Taylor's site... Thanks for the great idea!!! Merry Christmas and Happy Holidays!

Tuesday, November 2, 2010

GREEN MATERIAL SPOTLIGHT: Cardboard, Part 2

Part 2 of the Green Material Spotlight is where I feature lessons from my fellow art-teaching bloggers (plus a couple of my own.) Here are some great art lessons using CARDBOARD! One of the best parts about sharing units is that they can give way to many more amazing ideas in all of our classrooms. So inspiring!

by Anne Farrell from Use Your Coloured Pencils

by Ms. Ale from Art Lessons for Kids


by Megan at Plum Pudding


by EcoHeidi at Instructables

by Hester Jane at Fun in the Making

by Katie Gonzalez (me) at Briargrove Art Elementary Page

by Anne Farrell at Use Your Coloured Pencils

by Katie Gonzalez at Briargrove Elementary Art Page

by Julie Durocher at Ms. Durocher's Art Room

I have come across so many wonderful art units involving cardboard in the past! I couldn't find every one that I remembered. If you have or know of another great lesson, please leave a link in the comments! If I get together enough, I will do another post like this!

Tuesday, October 26, 2010

GREEN MATERIAL SPOTLIGHT: Cardboard, Part 1

CARDBOARD is by far one of my favorite materials to incorporate into art lessons! It's always abundantly available and there are TONS of ways you can use it to make art! It can be used in place of more expensive paper products such as card-stalk or matte board. It can have a smooth or rough tooth, making it compatible with a variety of materials. It's sturdy yet easy to manipulate. So versatile!

Cardboard is a paper product, which means it comes from trees. To find out more about how cardboard is made, click here. Cardboard is used to package and protect all sorts of items, from food to furniture to building materials to mail to... you name it! Millions of tons of cardboard boxes are used each year! Fortunately, cardboard can be recycled, and is biodegradable. However, it requires less time, money and energy to reuse than to recycle cardboard, and where better a place to do that than in the art room?!

WHERE CAN WE FIND THIS MATERIAL?
At Home:
- Boxes for food items such as cereal, pasta, sodas, crackers, cookies, frozen dinners, fruit snacks, popsicles, tea, baking packages, etc. Make sure that any item containing food is free of all residues, crumbs, etc. in order to avoid problems with allergies and bugs!
- Boxes for household items such as light bulbs, toothpaste, band-aides, beauty products, etc.
- Used moving or shipping boxes
- Shoe boxes, hatboxes, etc.
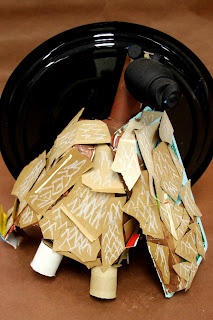
(I'll do a separate post about cardboard rolls!)

At Work:
- Boxes for office supplies such as paper clips, scotch tape, pencils, ink cartridges, etc.
- Boxes for reams of paper (these make GREAT storage boxes, and the lids are excellent supply trays)

In the Community:
- Grocery stores - lots of boxes for transporting food!
- Coffee shops - those little cardboard sleeves that keep your drinks warm are just begging to be reused after the drink has been guzzled down!
- There are infinite possibilities!!! So many things get thrown away, so look around!

HOW DO WE PREPARE THIS MATERIAL?
For thin cardboard (such as cereal boxes):
- Remove any inner bags, food particles, etc.
- Undo the top and bottom flaps so that the box can be flattened along it's side seams. (Do not crush or force box to flatten it - warping or creasing the flat surfaces of the box makes it way less useful as an art material.)
For packing/shipping boxes:
- Have an adult remove any staples or other sharp binding materials that may have been used to hold the box together.
- Remove anything left inside the box such as packing papers or peanuts.
- Remove any leftover tape, papers that were attached to the surface of the box, etc.
- Undo the binding so that the box can be flattened (do not crush or force box to flatten it - warping the flat surfaces of the box makes it way less useful as an art material)

HOW DO WE STORE THIS MATERIAL?
Depends on a couple factors: how much of the material are you collecting? what type(s) of cardboard are you collecting? what do you plan to do with it? There are lots of methods that can work; here's what we found effective:
For thin cardboard:
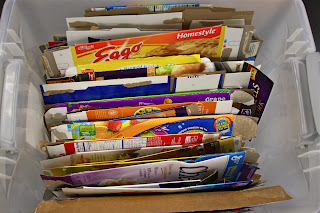
- Create a storage system that allows you to sort unused, flattened boxes by color. You will need a clear storage bin, box, shelf, or file drawer for the following colors: red, orange, yellow/gold, green, blue, purple, black/grey/silver, and rainbow.
- For storing thin cardboard boxes that have been cut up into smaller shapes use either one large, clear storage bin or many small, clear storage bins; the large bin can hold assorted colors, or the small bins can be used to hold separate colors.
Considerations: Students looking for boxes with specific colors and designs will find it helpful to be able to flip through flattened boxes as if they searching through a file drawer. Stacking boxes on top of one another, though convenient, often leads to big messes when students are in a rush. Also, it's good to have one box for leftover scraps of all colors so that students do not put small pieces back into the main boxes (which also leads to a big mess!)

For thick cardboard -
- The best options are either a wide shelf for stacking boxes or a vertical shelving system for standing boxes upright.
- Boxes should be flattened in order to take up the least amount of space.
- Keep in mind fire safety regulations in your building. Remember that cardboard is flammable and can be a fire hazard if not properly stored!
- Considerations: When stacking flattened boxes on top of one another, stack biggest on the bottom to smallest on top - otherwise the stack could topple. The same works well for vertical stacking, so that all boxes are easy to find. Also, flattened boxes that are stored vertically can sometimes bend, warp, or become worn at the edges.

WHAT OTHER ART MATERIALS ARE COMPATIBLE?
Acrylic paint - adheres nicely to cardboard; be careful not to water-down paint, a thick layer is needed to cover print or color already on the box
Spray Paint
Exacto and Utility Knives - blade will need to be replaced somewhat frequently for smooth cuts
Duct Tape & Packing Tape
Hot Glue - for attaching heavy items
Elmer's Glue - for attaching lightweight items like paper, buttons, soda tabs (some heavier items like bottle caps work for this too - you just have go put on a thick layer of glue and let it dry for a long time!)
Permanent Markers
Heavy-Duty Paper Cutter (as long as it specifies capability for cutting cardboard) - works well to quickly cut thin cardboard
Kids Scissors - for thin cardboard only

WHAT MATERIALS ARE NOT COMPATIBLE?
Washable Markers - will not stick to the surface of glossy cardboard; colors do not show up well on colored surface.
Watercolor Paint - will not stick to glossy surface; colors do not show up well on colored surface; water causes cardboard to warp or disintegrate.
Kids Scissors - do not work well on thick cardboard (like that of a moving box); using these to cut thick cardboard can cause the scissors to become dull and loose.
Glue sticks - generally, glue sticks do not work well with heavier, thicker materials like cardboard.
Masking Tape and Scotch tape - both either do not have strong enough adhesive to hold onto cardboard

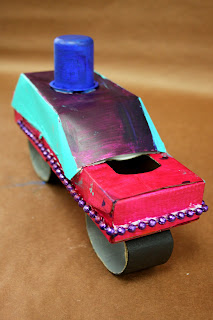
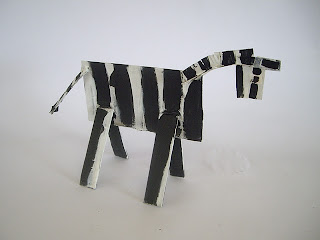
HOW CAN WE USE THIS MATERIAL?
Here are just some of the ideas and processes we implemented in the art room last year:

Classroom Tools:
Storage - this one's pretty obvious, but cardboard can be really helpful for art teachers on a tight budget looking for ways to store supplies!
Recycling Bins - We use the boxes that reams of paper come in to hold recycled paper scraps leftover from art units. The box can then be taken directly to the recycling bin outside!
Protective Work Surface - Flatten large cardboard boxes and lay them on the table or floor to protect from messy materials such as paints and permanent markers or to protect from sharp materials like exacto knives and carving tools.
Drawing Boards - When I run out of clipboards I like to use firm, thick, flat cardboard cut into rectangles. Sometimes my students prefer them, since they allow for bigger sheets of paper. And when you're done with them, you can use them as bases for collages or sculptures.

Art Supplies:
Cardboard can pretty much be used in any art assignment that would normally involve paper, such as drawing, collage and painting. It is also strong enough to be used as part of a 3D form. The possibilities are endless, but here are some ways you can use cardboard for art:

As a Canvas - You can create a clean slate capable for use with any material - permanent markers, acrylic paints, oil pastels, etc. To get the "canvas" ready, there are a few options:
With little prep: Use the plain, brown side of a cardboard box. Use an exacto knife, paper cutter or scissors to cut the box into the desired rectangular shape, or let the students cut their own unique shape for their "canvas."
With more prep: After trimming the cardboard into the desired shape, coat it one or more times with gesso. This helps to cover any print on the box, can add extra tooth to the surface, and give the students a white surface to create on. Certain materials will show up way better on a gessoed surface. Gesso keeps paint from absorbing into the cardboard, which mean you can use less paint to get a greater opacity. Materials like colored pencils and charcoal will show up and hold better on a gessoed surface.
To find out more about our murals created on large cardboard boxes, click here.

As a Collage Element - We used thin cardboard A LOT for collage last year. We sorted it into colors and cut & glued pieces to create free form collages of animals which were later added to our large cardboard mural paintings. In other units, we ripped apart corrugated cardboard as an element to add texture to our collages. We cut and glued shapes out of thin cardboard and glued them to paper along with other recycled materials. So many possibilities!

As a Relief Sculpture - You can cut shapes out of semi-thick cardboard using scissors or exacto knives, glue them together with Elmer's glue or hot glue, then cover the surface with any variety of materials such as acrylic paint, oil pastels, or spray paint. Two years ago, we gathered all the cardboard boxes in our school and cut them up to make relief sculptures in the style of Frank Stella. The students created sculptures that described a sport or hobby that they liked to do. We used children's scissors, Elmer's glue, and oil pastels. Here's where we got our inspiration for that unit.
- You can also use thick or thin cardboard as a base for a mixed-media relief sculpture. Keep in mind, the heavier a material is, the more likely it will need a stronger glue in order to stay intact. Last year, my kinders cut cloud shapes out of thin cardboard and used Elmer's glue to attach lots of found materials such as bottle caps. The final sculptures were painted with tempera paint. While I would recommend acrylic paint for overall quality, thick tempera worked well for this grade level. To learn more about our cloud unit, click here.

As a Printing Plate - Create calligraph printing plates using thick cardboard squares as bases. Details can be added to the plate using thinly cut cardboard, string, soda tabs, bubble wrap or other items with a similar thickness. All items can be attached using elmer's glue. In order to print from the plate multiple times, coat the plate with a thick layer of gloss medium. This will allow you to clean the plate with a wet sponge and reuse it a few more times. I will be posting our calligraph plates and prints soon on the BG Art Page. When I do, I will post a link here.

As a Stamp - This is really just a modification of the Printing Plate. Cut shapes from cardboard and simply glue a bottle cap to the back to use as a handle. Then use as stamps!

As a Sculptural Element - Cardboard can be cut, ripped, stacked, layered, and joined. It can be used alone, or combined with other 3D materials. Almost all glues work when constructing with cardboard. Duct tape and packing tape are the only tapes that really hold well over time. Masking tape and clear scotch tape generally peel off or are not strong enough to stay put on cardboard. We used all types of cardboard last year as part of our bird sculptures and eco-friendly machines.

WHAT ELSE CAN WE DO WITH CARDBOARD?
I WANT TO HEAR FROM YOU!!!
I would love to see some of the units other green art enthusiasts have created using cardboard! Please tell me about what you have done with your students, post a link to your lesson, or point me in the direction of an artist who uses cardboard! Part 2 of my Cardboard Spotlight will include some of those resources!

Wednesday, September 29, 2010

ARTIST INSPIRATION - Stuart Haygarth

FEATURED ARTIST: Stuart Haygarth, born 1966, UK
ABOUT THE ARTIST: "Starting in 2004 I have been working on design projects which revolve around the collections of objects. The objects are normally collected in large quantities, categorized, and assembled in a way that transforms their meaning. My work is about giving banal and overlooked objects a new significance. The finished piece of work takes various forms such as chandeliers, installations, functional and sculptural objects."
Find out more: www.stuarthaygarth.com
ECO-FRIENDLY BECAUSE: Haygarth uses found materials that would otherwise become trash.
(green) MATERIALS USED: A variety of found objects, including: colored glassware, used party poppers, tail light covers, prescription eye glasses, and all sorts of plastic. (Visit Haygarth's PRODUCTS page to see what he has created with these various materials.)
SELECTED WORKS:

Above: Tail Light, 2007. Haygarth created light fixtures by reusing tail light covers, mainly from trucks, tractors and trailers. Haygarth sees the covers as "beautiful and complex", and feels that the finished sculptures are "reminiscent of stained glass".
Above: Tide, 2004 The Tide chandelier is made of mostly clear and translucent plastic objects - "man-made debris" - that Haygarth found on a specific part of the Kent coastline. Haygarth describes the shape of the chandelier as "an analogy for the moon, which effects the tides, which in turn wash up the debris."
POSSIBLE UNIT IDEAS:
NOTE: These ideas are not necessarily appropriate for all students and should be thought of as mere starting points for art unit idea development. As every teacher knows, lessons should be based on unique classroom and student needs, goals and abilities, grade level, and safety, availability and appropriateness of materials! If you have other ideas for art units based on Stuart Haygarth's artwork, or want to share other artists who work within a similar theme, please leave a comment below!
a) Students collect plastic objects from home that are no longer in use or are going to be thrown away and use them to create an individual or collaborative chandelier, mobile, installation or sculpture.
b) Students collect discarded objects (AKA litter!) from the playground, a nearby park, or other nearby location for a certain period of time (one day, two weeks, one semester, etc.) Students wash, sort, and categorize items, then work together to create sculptures out of each group of objects. Be sure to establish clear ground rules before collecting - i.e. wear gloves, no sharp objects, don't put anything in your mouth, etc.
c) Students and teacher discuss how the form of the Tide chandelier creates a relationship between the objects and where they were collected from. Students each gather a collection of discarded materials found in a particular location, then assemble them to create a form that relates to the environment in which the items were found. (For example: create a tree-shaped form out of objects found in the forest.)
d) Students create a functional light fixture out of found objects.

Tuesday, September 28, 2010

Hello Green Art Lovers!

I haven't updated this blog in quite some time, and it's been eating away at me for a while! Last school year, we got so busy creating art with recycled materials that I rarely found the time to blog about it! Oh, what an amazing year. I am proud to say that I managed to work recycled materials into EVERY SINGLE UNIT for EVERY SINGLE GRADE LEVEL K-5 for THE WHOLE YEAR!!! What a success!!!
.
Over the course of the year, our school really grew to know and care a lot about reusing, reducing and recycling. Ms. Abair (now Mrs. Plaia!), our wonderful new science teacher, headed up a major recycling program that students from all grade levels (even kindergarten!) participated in. Every Friday, our students collected, sorted and took out plastic bottles, paper, and cardboard from all over the school.
.
And in the art room, we were overflowing with daily donations of materials to reuse and repurpose for art-making, ranging from bottle caps to cereal boxes to containers of all shapes and sizes, even old toys and jewelry! Every class explored different ways we could turn potential trash into something worthwhile and meaningful. The community at Briargrove really got behind our Green initiatives, and the students became deeply committed to the cause - a healthier, more beautiful planet. And I KNOW our school made a difference in the world last year!
.
If you haven't already noticed on my classroom blog, I am not at Briargrove right now. Yes, I am still the art teacher!!! I'm just on leave - MATERNITY LEAVE! My husband and I were blessed with our first little girl, who came into the world two days after school started this year. So, while I am at home, I have been brainstorming what I want to do with this blog. And I think I have figured it out!
.
While I'm here on leave (when I can find the time), I am going to focus on gathering some resources for all the Green Art enthusiasts out there - and especially all the art instructors out there who are interested in teaching our students how to be more resourceful and environmentally aware as they create.
.
I will be adding regular, recurring features to the blog, and I hope they are interesting and useful to you all! As always, be sure to check out the Briargrove student art page to see some of the amazing Green Art from last year! We will be adding to it once I return to work!
.
Have a great school year everyone!
Mrs. Gonzalez

Thursday, March 4, 2010

Donations Needed!

We’re still going strong with our recycled material art units. Right now fifth grade is in need of some items and we just don’t seem to be getting enough. I KNOW these are things we can find around the house, and any little donation will do. Plus, it’s a chance to purge – spring cleaning! If anyone from the Briargrove community has any of these items and you’re willing to part with them, please drop them off anytime at the front office. The students would be so grateful! (Items in bold are especially needed.)

Buttons
Beads of any size, shape, color, in any amount
Thread Spools
Small random pieces of plastic, Styrofoam, metal, wooden, etc.
Styrofoam egg cartons
Marker, pen and glue caps

Large bottle caps (like those from detergent and shampoo bottles)
Leftover raw noodles, especially bow tie, wagon wheel and penne type shapes
Bubble Wrap
Corks
Soda Tabs
Any kind of netting (from bags of fruit, cheese, wine bottles, etc.)
Interesting containers no larger than a square foot cube (like coffee tins, unique plastic bottles, fruit and veggie baskets, single serve Pringles packages, etc. etc.)

Of, course, just like I tell the students, don’t buy or donate anything new or still needed at home. And please make sure everything donated has been rinsed of any food or detergent particles. Any little donation will do – small amounts accumulate! Thanks so much for your help!!!

Friday, January 29, 2010

ARTIST INSPIRATION - Recreating Nature

Looking for more examples of professional artwork using recycled materials to create art that promotes an appreciation for nature. Here are just a couple examples:
Above is an amazing forest made from old rulers by Lizzie Thomas. Inspiring!
This butterfly is one of many beautifully constructed by Michelle Stitzlein, who uses found objects in her work. Michelle is also the artist who gave us the idea for the amazing bottlecap mural we are getting ready to begin!

Do you know of other artists who use recycled materials and focus on nature as a major theme in their work? Please share them with us!